
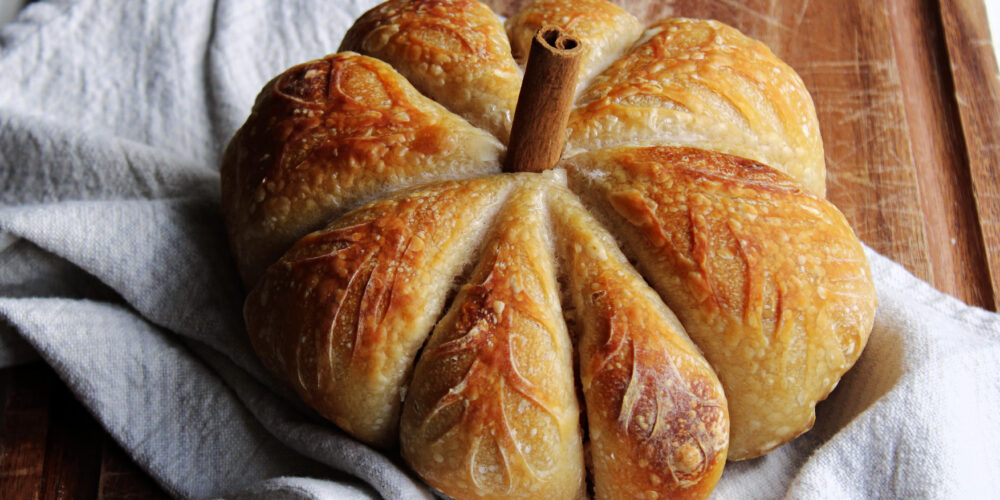
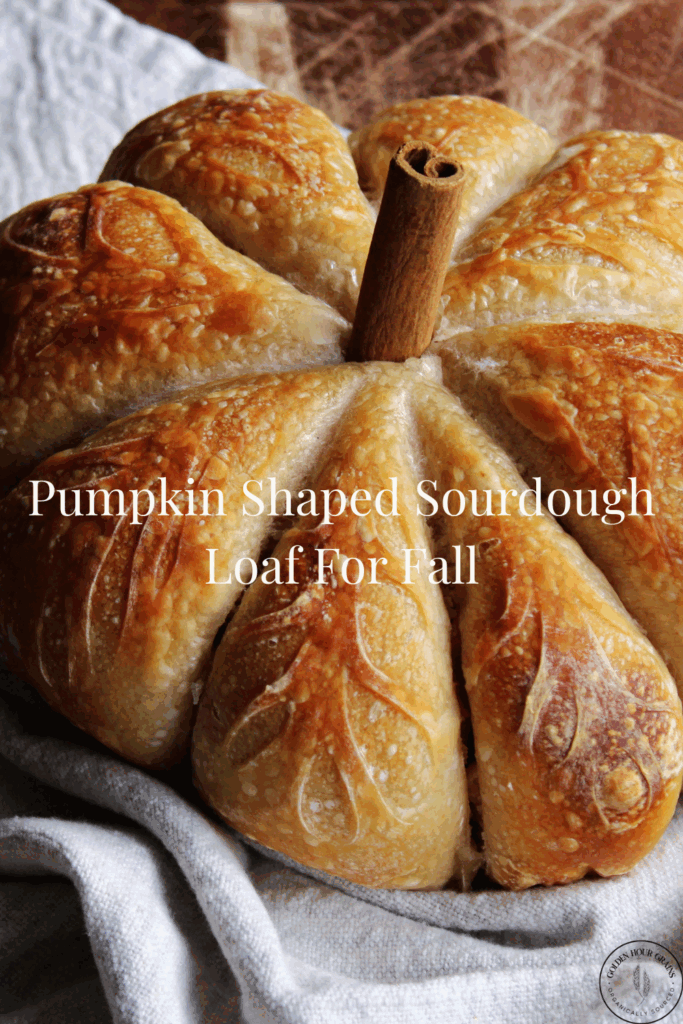
If you’ve ever wanted your sourdough to feel as festive as fall itself, this pumpkin-shaped sourdough loaf for fall is the perfect weekend bake. In this post, I’ll show you how to turn your favorite sourdough recipe into a pumpkin-shaped loaf using just twine and a little creativity.
With it’s golden crust and rustic edges, this pumpkin-shaped sourdough loaf makes a stunning addition to your fall table. It’s perfect if you’re hosting Thanksgiving or just craving something cozy. No fancy tools or carving skills required. Just flour, water, salt, and a love for autumn baking.

Why You’ll Love This Recipe
Budget Friendly – This recipe requires flour, water, starter, and salt. That’s it. These are all pantry staples for us so no running to the grocery store for extra ingredients for this one.
No Extra Effort – The effort it takes to make a sourdough pumpkin-shaped loaf for fall is minimal if any. All you need is a sourdough recipe you love, and if you don’t have one here is our same day sourdough recipe that is tried and true, and some butchers twine. That’s all it takes to make it look like you spent more time than you did making this fall-inspired sourdough.
Easy and Festive – The holidays are so busy and can be exhausting sometimes. But it’s so fun to participate in all of the festive things! This sourdough recipe is a great way to be festive and switch things up without requiring you to learn an entirely new skill-set in the process.
Tips For Making the Pumpkin-Shaped Loaf
- Tie the twine after the cold proof. The dough will be firmer and much easier to manage at this stage.
- Use the bulk fermentation chart by The Sourdough Journey to determine how long your fall-inspired sourdough pumpkin shaped loaf needs to sit on the counter for. If your dough runs cold like mine, it will need to sit out longer than you think. This chart is a game changer! Please use it!
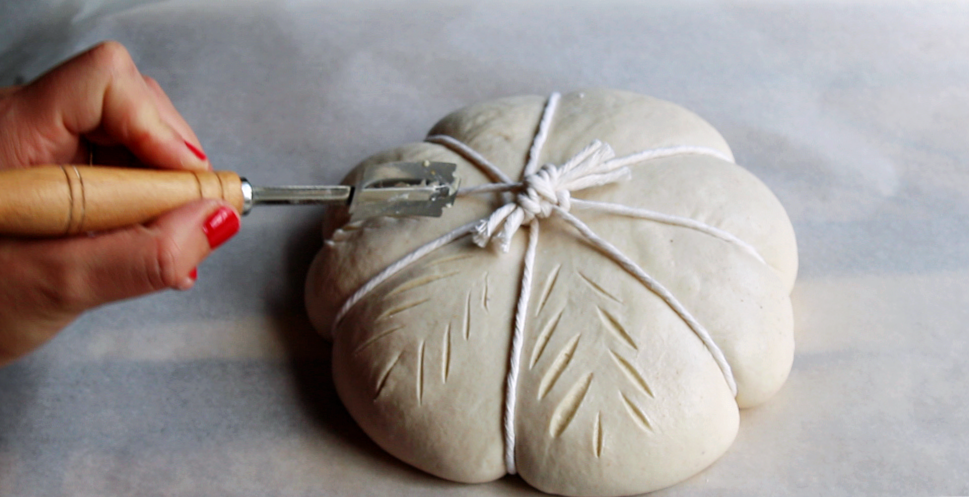
- Make your expansion score along one of the edges of the twine so the loaf still maintains it’s pumpkin shape.
Tools You May Need
Stand Mixer
Dough Whisk
Large Bowl
Lame or sharp knife
Banneton basket or large bowl
tea towel or plastic bag
Food scale – I will always tell you to use a food scale for accurate measurements, but if measuring cups is all you have that’s okay.
Dutch Oven
Bench scraper – for shaping the dough
Parchment paper
Butchers twine
Ingredients for the Pumpkin-Shaped Loaf
Feeding your Starter
Feed your starter 4 – 6 hours before making this chocolate swirl sourdough loaf. You want your starter to be bubbly and active before mixing. If you want to be super accurate while doing this, use a 1:1:1 ratio (equal parts starter, water, and flour by weight). We follow the measurements below and still get a bubbly starter in the same amount of time. I also feed my starter right before bed the night before and it’s always ready to go in the morning. This could work great for those of you that have a colder home.
1/2 cup – bread flour
1/2 cup – whole wheat flour
1 cup – water
For the Dough
450g – Bread Flour
10g – Salt
307g – Water
100g – Sourdough Starter
Cinnamon stick – To add on top as the stem for our pumpkin loaf.

How Bulk Fermentation Effects Your Loaf
Bulk fermentation plays such an important role in teh final look and texture of your pumpkin-shaped sourdough loaf. This is the stage where your dough develops flavor, structure, and strength. Three things that are especially important when shaping your loaf into a pumpkin.
If your bulk fermentation is underproofed, your dough may resist shaping, feel tight, and spring back too much. This could lead to a cracked or uneven pumpkin shape and a dense crumb.
One the other hand, overproofed dough will feel overly slack and may not hold it’s shape well, making the pumpkin lines flatten or disappear after baking.
Aim for dough that feels airy, strong, and elastic. It should have visible bubbles on top, pull away from the sides of the bowl slightly without sticking to the edges. and feel puffy but not overly fragile.
Getting bulk fermentation right ensures your pumpkin-shaped loaf holds definition, bakes evenly, and slices beautifully. In order to achieve these things we highly recommend you take your dough’s temperature. We use a meat thermometer and that works really well. More important than that, we use the bulk fermentation chart by The Sourdough Journey. This chart will tell you EXACTLY how long your dough should be fermenting on the counter based on it’s temperature. This resource has changed the game for us in our microbakery and hopefully it will help you in your kitchen too!
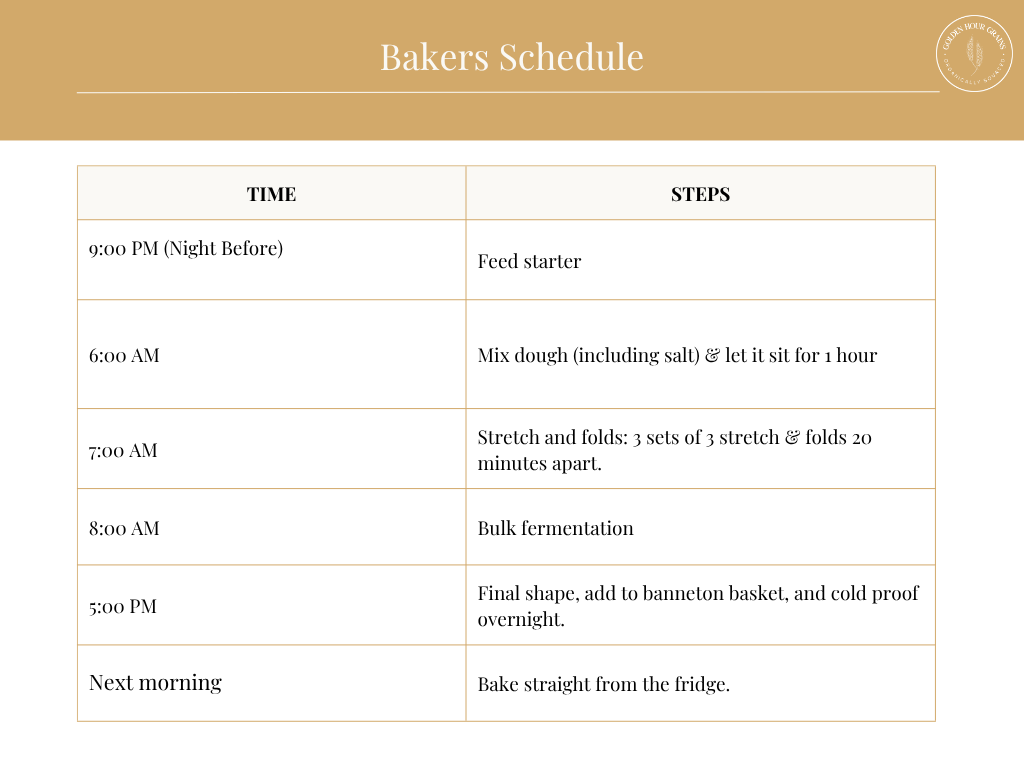
Baker’s Schedule (Adjust if Needed)

How to Make Pumpkin-Shaped Sourdough Loaf For Fall
Making a pumpkin-shaped sourdough loaf is easier than it looks. With a few simple tools and some gently shaping, you can create a festive, fall-inspired loaf that’s perfect for the season. Here’s how to do it.
1. Prepare the Dough
Use your favorite sourdough recipe and bulk ferment the dough as usual. If you don’t have a go to sourdough recipe, here’s ours. Just make sure to use the bulk fermentation chart we talked about eariler. The cliff notes for the measurements are below.
450g – Bread Flour
10g – Salt
100g – Active Starter
307g – Water
2. Shape the Dough
After the bulk fermentation, gently pre-shape the dough into a round using a bench scraper. Tuck the bench scraper under the dough and move the bench scraper into a clock-wise (counter-clockwise if you’re left handed) motion until the dough starts to get smoother and tighter.


3. Final Proof
Once your dough has been shaped, place it in a banneton basket or a large bowl and cover it with a tea towel or a plastic grocery bag. Let your dough cold proof for 12 – 15 hours.
4. Tie the Twine & Bake the Fall Pumpkin-Shaped Sourdough Loaf
Preheat your oven to 420 degrees. Preheat your dutch oven as well.
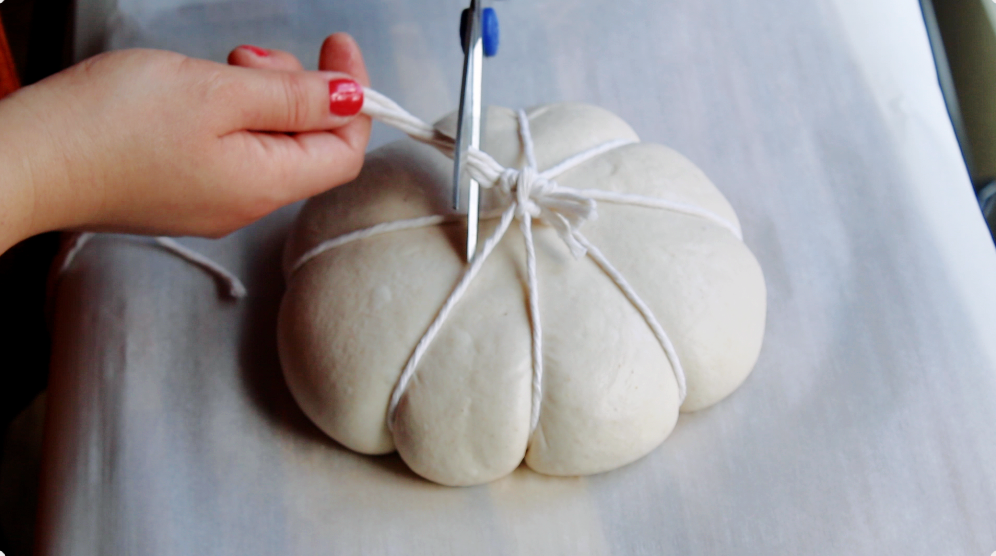
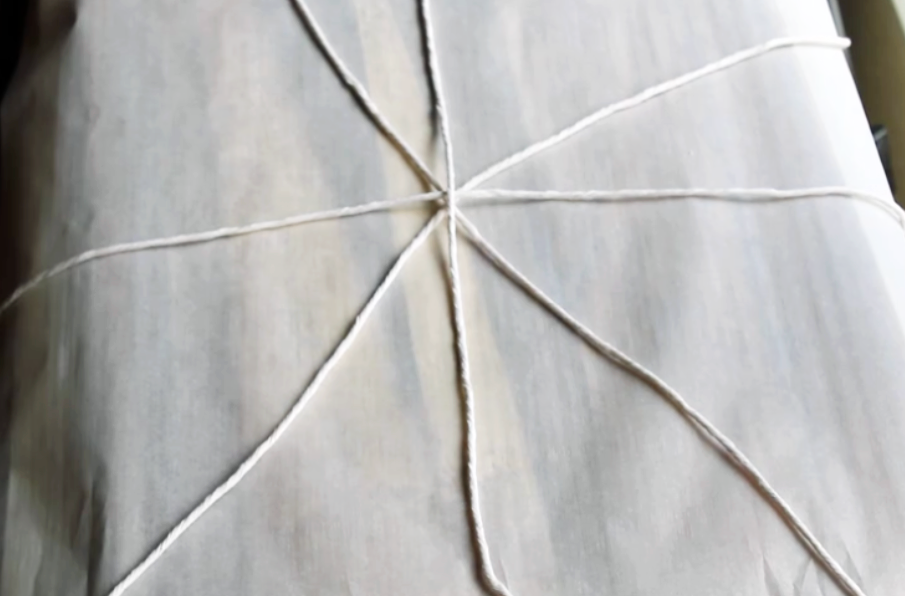
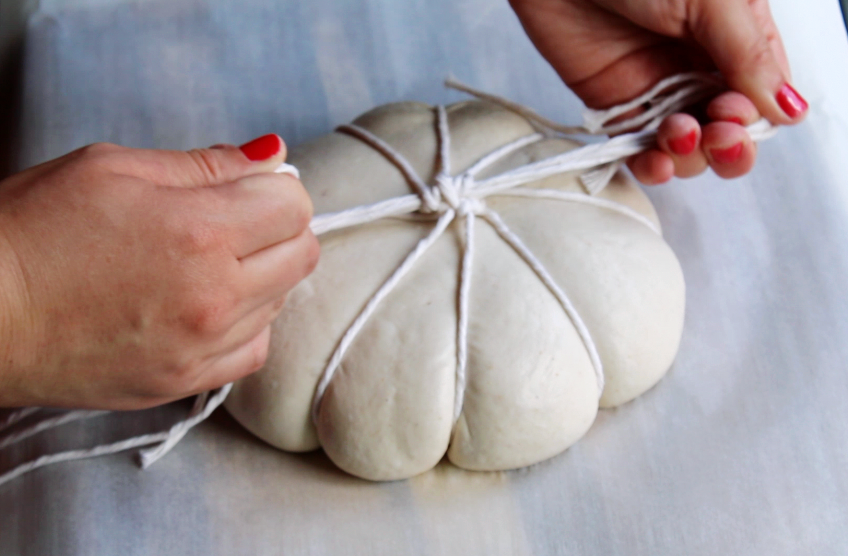
Take a piece of parchment paper, add flour to it, and start laying out your twine to create 8 sections. The twine should create a pizza shape.
Next, place your dough on top of the twine and start tying knots until every piece of twine is tied around the dough.

Place your dough on top of the pre-heated oven to help the dough reach room temp faster.
Once your oven has finished preheating, take your lame or sharp knife to create an expansion score along the twine.
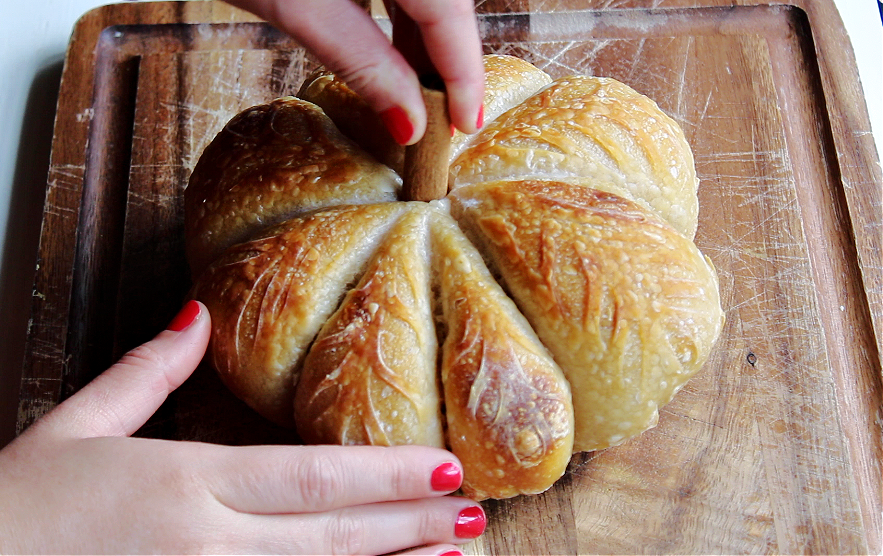
Bake at 420 degrees for 25 minutes with the lid on and 25 minutes with the lid off.
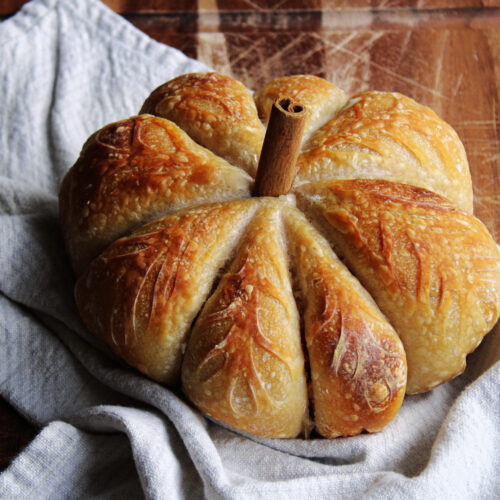
Once the fall pumpkin-shaped sourdough loaf has cooled, remove the twine, and place a cinnamon stick at the top to act as the stem.
Enjoy!
Storage
Store your fall inspired pumpkin-shaped sourdough loaf in the fridge for 5 – 7 days or the freezer for up to 3 months.
Make a Pumpkin-Shaped Sourdough Loaf for Fall
Equipment
- Stand Mixer
- Dough whisk
- Large Bowl
- Lame or sharp knife
- Banneton basket or large bowl
- Tea towel or plastic bag
- Food scale
- Dutch oven
- Bench scraper – for shaping the dough
- Parchment paper
- Butchers twine
Ingredients
Feeding Your Starter
- 1/2 cup Bread flour
- 1/2 cup Whole wheat flour
- 1 cup Water
For the Dough
- 450 g Bread Flour
- 10 g Salt
- 307 g Water
- 100 g Sourdough Starter
- 1 Cinnamon stick To add on top as the stem for our pumpkin loaf.
Instructions
1. Prepare the Dough
- Use your favorite sourdough recipe and bulk ferment the dough as usual. If you don't have a go to sourdough recipe, ours is linked above. Just make sure to use the bulk fermentation chart we talked about eariler. The cliff notes for the measurements are above.
2. Shaping the Dough
- After the bulk fermentation, gently pre-shape the dough into a round using a bench scraper. Tuck the bench scraper under the dough and move the bench scraper into a clock-wise (counter-clockwise if you’re left handed) motion until the dough starts to get smoother and tighter.
3. Final Proof
- Once your dough has been shaped, place it in a banneton basket or a large bowl and cover it with a tea towel or a plastic grocery bag. Let your dough cold proof in the fridge for 12 – 15 hours.
4. Tie the Twine and Bake the Pumpkin-Shaped Loaves
- Preheat your oven to 420 degrees. Preheat your dutch oven as well.
- Take a piece of parchment paper, add flour to it, and start laying out your twine to create 8 sections. The twine should create a pizza shape.

- Next, place your dough on top of the twine and start tying knots until every piece of twine is tied around the dough.

- Place your dough on top of the pre-heated oven to help the dough reach room temp faster.
- Once your oven has finished preheating, take your lame or sharp knife to create an expansion score along the twine.

- Bake at 420 degrees for 25 minutes with the lid on and 25 minutes with the lid off.
- Once the fall pumpkin-shaped sourdough loaf has cooled, remove the twine, and place a cinnamon stick at the top to act as the stem.

Notes
Storage
Store your fall inspired pumpkin-shaped sourdough loaf in the fridge for 5 – 7 days or the freezer for up to 3 months.Bulk Fermentation
Please use the bulk fermentation chart linked in our post to determine how long your dough should sit out on the counter.Additional Tips
Make your expansion score along one of the edges of the twine so the loaf still maintains it’s pumpkin shape.If you tried this recipe and loved it please come back and give this recipe 5 stars! Don’t forget to follow us on Instagram @goldenhourgrains.
Want More Sourdough Recipes?
Check these out!
Chocolate Swirl Sourdough Bread
Sourdough Discard Pumpkin Chocolate Chip Muffins
Pumpkin Cinnamon Sourdough Bread
Are you local?
If you live in the Lubbock, TX area we would love to bake bread for you! Sign up for reminders for our next bread drop so you don’t miss a chance to pre-order bread from us!
Pin For Later:


Leave a Reply