
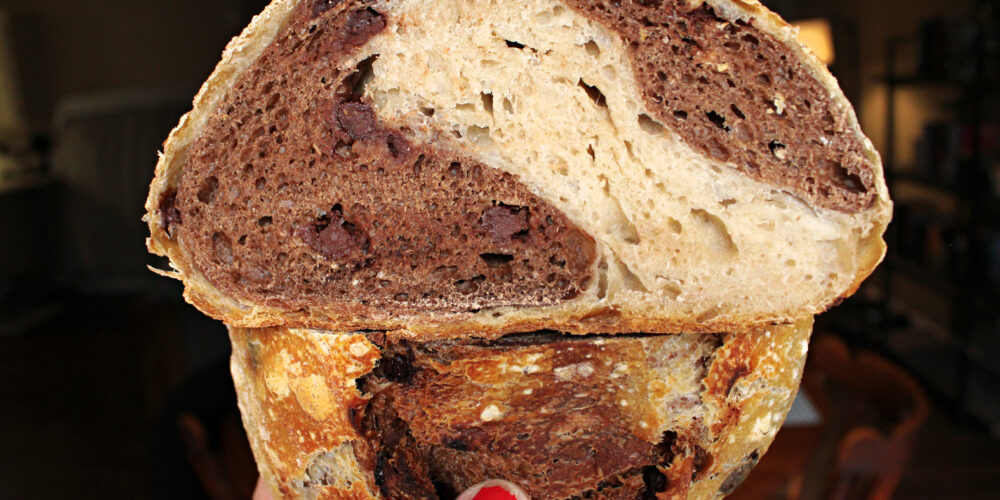
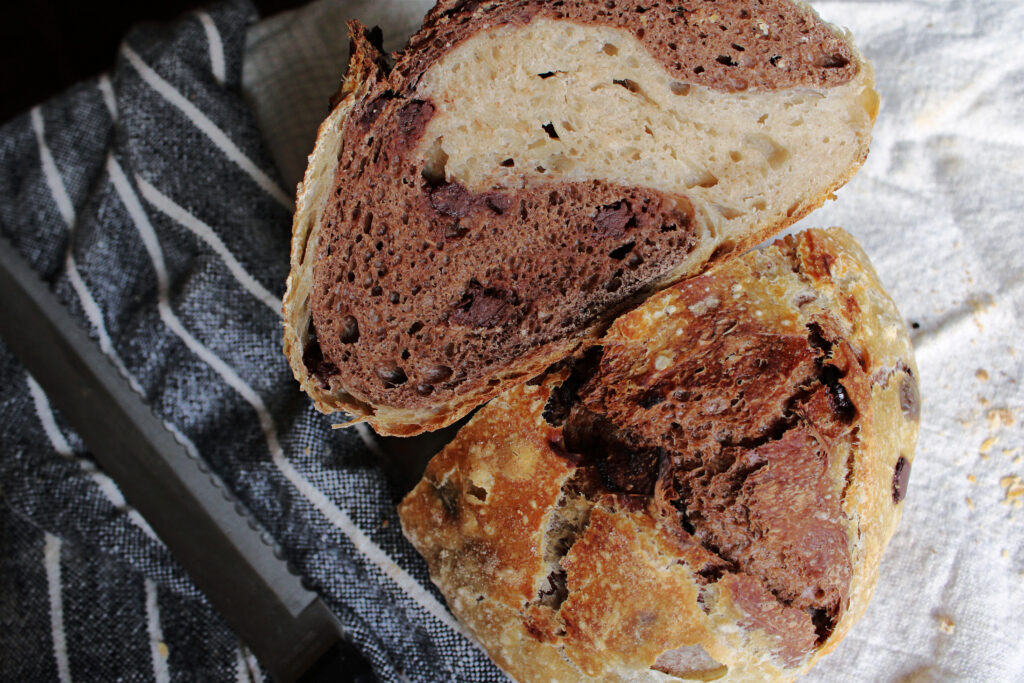
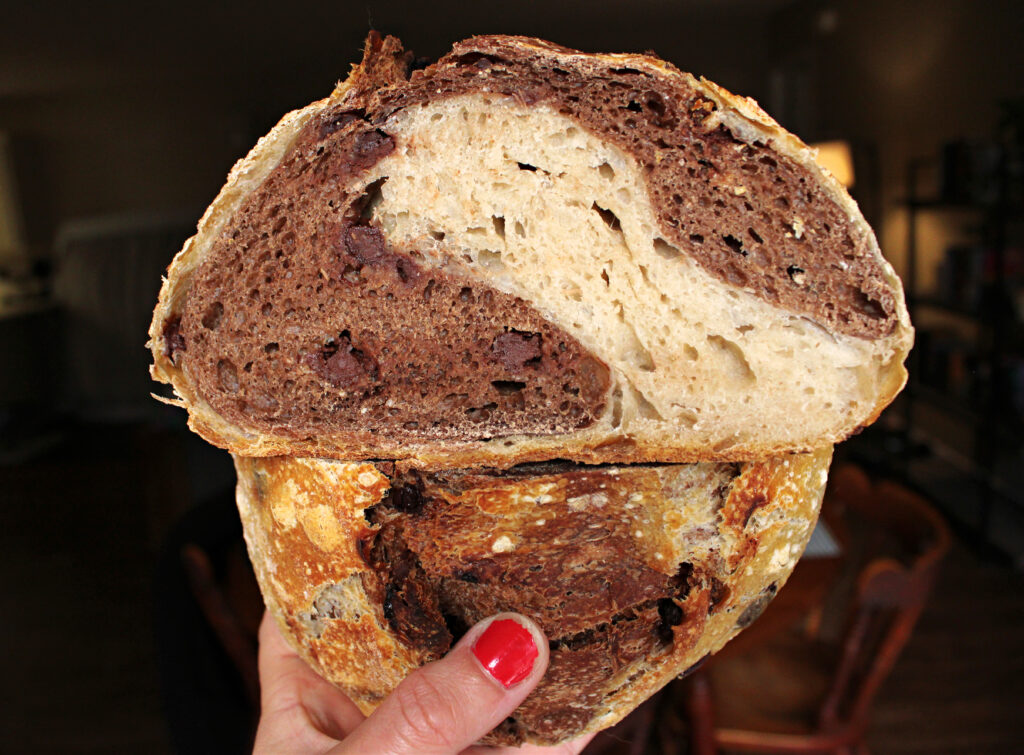
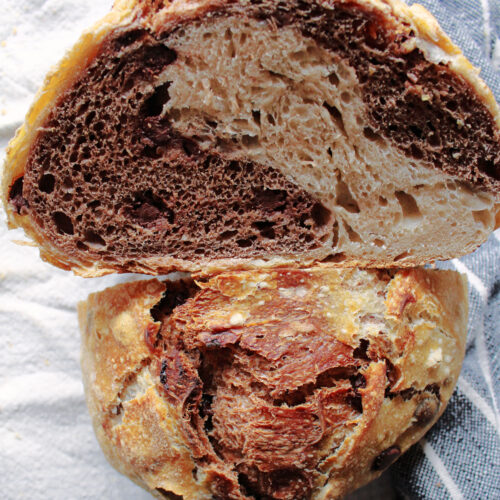
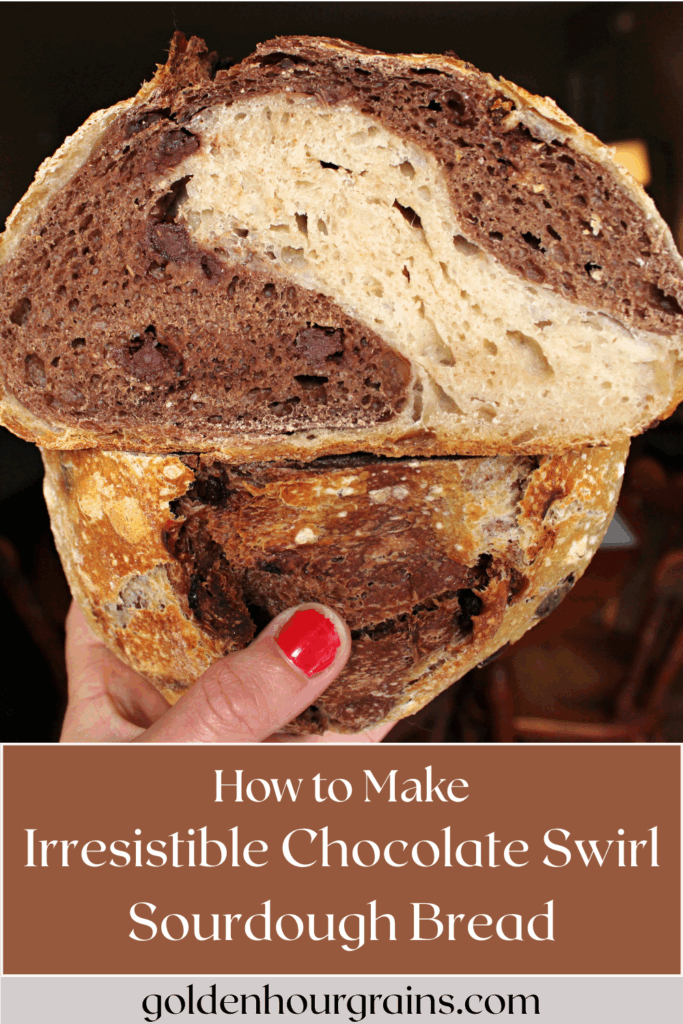
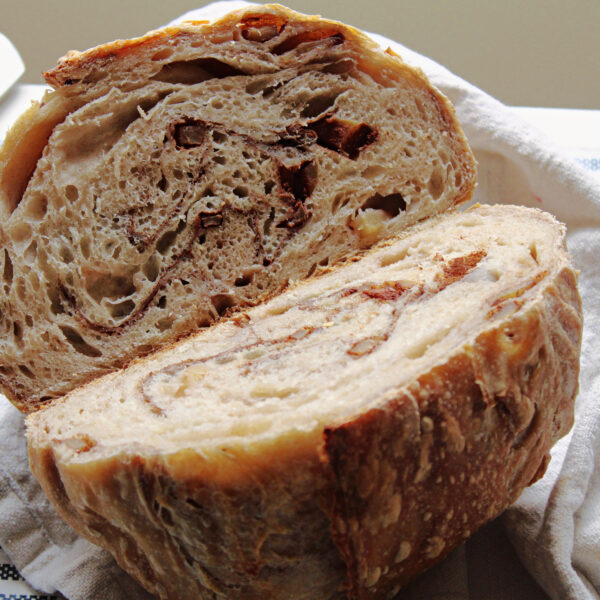
This irresistible chocolate swirl sourdough bread is a fun and simple twist on a classic sourdough bread recipe. Made with cocoa powder and chocolate chips, it has just the right amount of sweetness. Perfect for breakfast, snacking, or dessert.
The rich chocolate swirl adds a beautiful marbled look that feels impressive but is surprisingly easy to pull off! If you’re looking for a sweet sourdough bread that’s soft, flavorful, and visually stunning, this recipe is a must try.
Why You’ll Love This Recipe
A sweet twist on a classic – This combines the structure of an artisan sourdough loaf with a chocolatey swirl that’s both beautiful and delicious.
Uses up ingredients you already have – Just add cocoa powder and chocolate chips to your go -to sourdough formula. If you don’t have a go-to formula, check out our same day sourdough recipe!
Impressive but easy – This chocolate swirl sourdough bread looks like it was made in a bakery, but doesn’t require any crazy, complicated steps or shaping. An instant win.
Flexible flavor – You can adjust the sweetness or chocolate intensity to your preferences. The flavor in our recipe is a subtle chocolate flavor so keep that in mind.
Tips on the Chocolate Swirl Sourdough
- Make sure the chocolate layer lays on top of the normal bread layer. otherwise you might not get the swirl effect we’re going for.
- Adding inclusions will make the bulk fermentation process a bit slower so if it needs to sit out much longer than you’re used to, that’s okay.
- Adding the cocoa powder to the dough will absorb more water so you might not have to do as many stretch and folds. If the dough is tight, don’t worry about how many stretch and folds you’ve done.
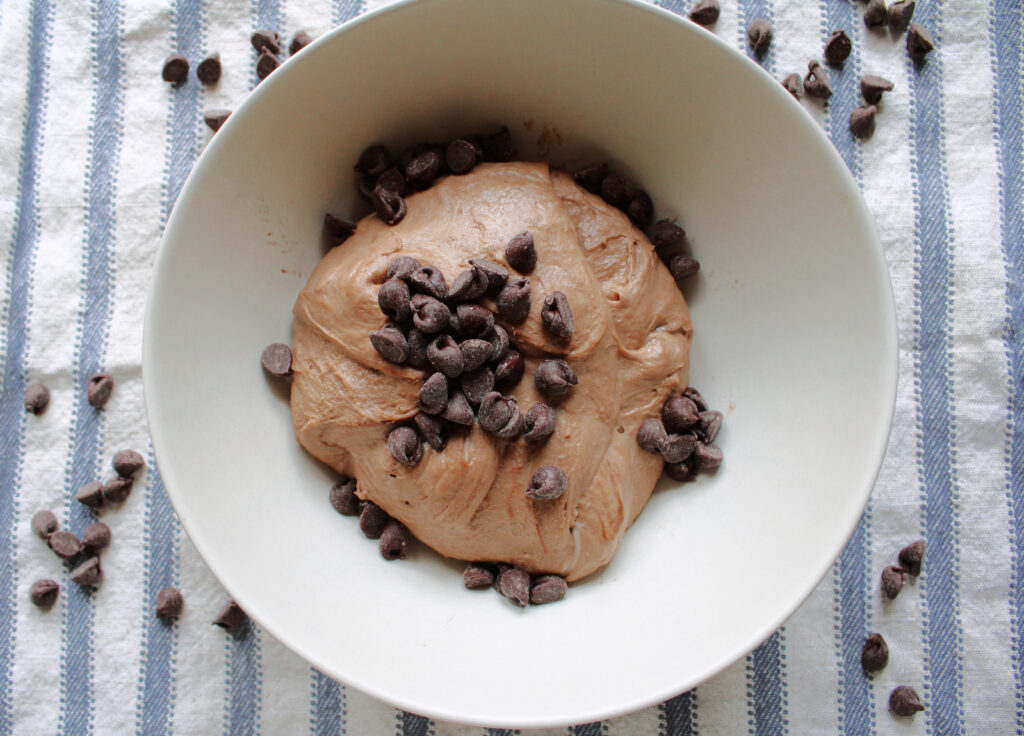
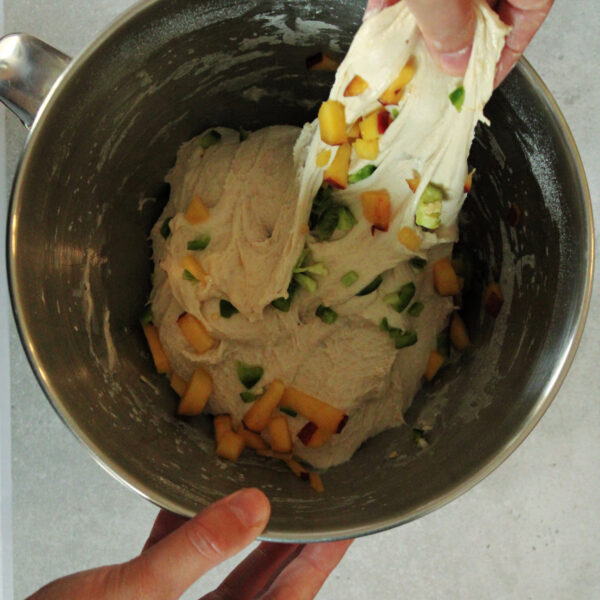
- Add the chocolate chips to the last round of stretch and folds. This will make it a bit easier to fold the chips into the dough since the dough will have a bit more structure.
Tools You May Need
Kitchen scale – You can use measuring cups, but your ratios might be inaccurate.
Measuring spoons
Stand mixer
Two large bowls – One for the chocolate dough, one for the normal dough
Tea towels
Dough scraper – For pre-shaping the dough.
Banneton baskets – You can also use your bowls.
Dutch oven
Lame or sharp knife – for scoring
Ingredients for the Chocolate Swirl Sourdough Bread
Feeding Your Starter
Feed your starter 4 – 6 hours before making this chocolate swirl sourdough loaf. You want your starter to be bubbly and active before mixing. If you want to be super accurate while doing this, use a 1:1:1 ratio (equal parts starter, water, and flour by weight). We follow the measurements below and still get a bubbly starter in the same amount of time. I also feed my starter right before bed the night before and it’s always ready to go in the morning. This could work great for those of you that have a colder home.
1/2 cup – bread flour
1/2 cup – whole wheat flour
1 cup – water

For the Dough
***We are going to be cutting this recipe in half in order to create the layering effect. Everything that you see below, divide by two.***
95g active sourdough starter
307g water
450g bread flour
10 g salt
1 tablespoon of cocoa powder for the chocolate dough only.
handful of chocolate chips – chocolate dough only.
How Inclusions Effect Bulk Fermentation
Adding cocoa powder and chocolate chips can slow down the fermentation process. The cocoa powder will absorb more water which is why the dough gets tighter during the stretch and fold process. You might not need to do as many stretch and folds with the chocolate dough.
The chocolate chips add fat and sugar which both impact the gluten development. Because of this, make sure you keep in mind that your dough might have to bulk ferment a bit longer than usual.
Everyone’s house temperature and climate is so different so it’s hard to give all of you an exact length of time for bulk fermentation. For this reason we highly recommend taking your doughs temperature. We use a meat thermometer and it works great. We also HIGHLY recommend using the bulk fermentation chart by The Sourdough Journey. Depending on the temperature of your dough, this will tell you EXACTLY how long your bread should ferment.
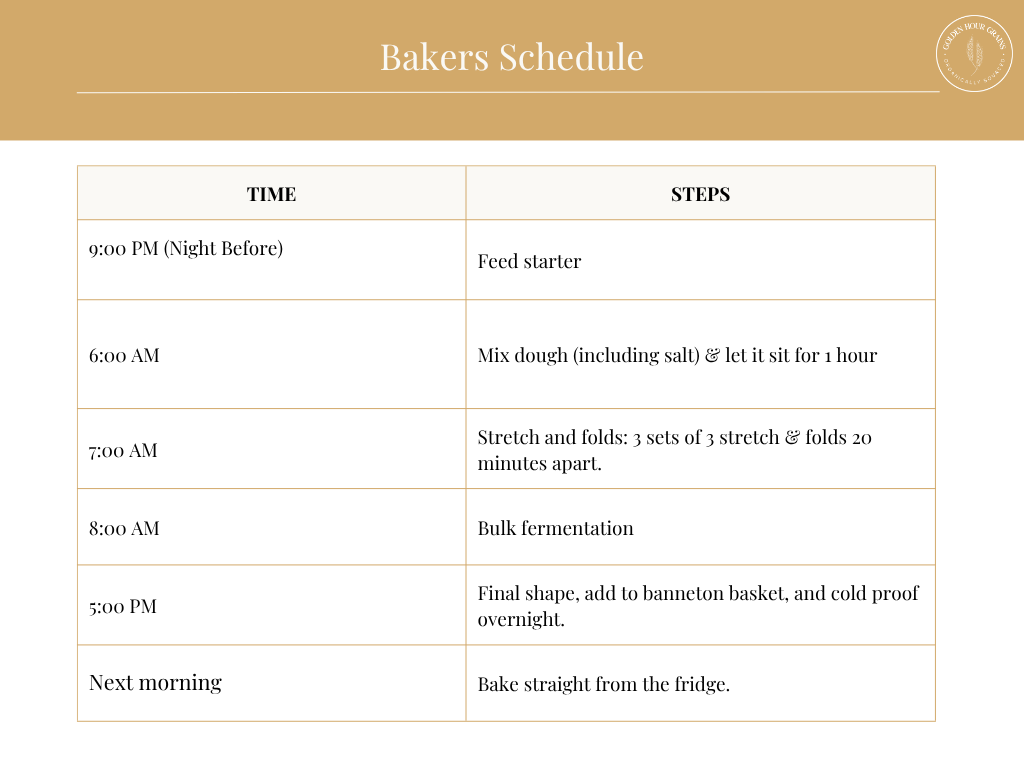
Bakers Schedule (Adjust if needed)
How to Make Irresistible Chocolate Swirl Sourdough
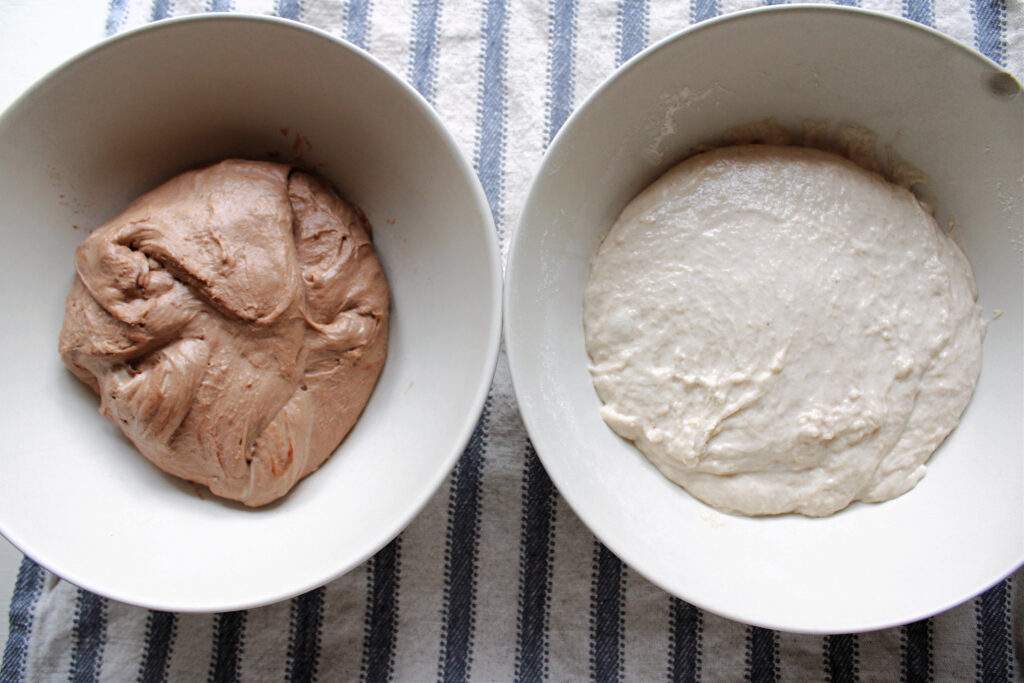
1. Make Both Doughs
Combine half the amount of flour, water, active starter, and salt into a stand mixer until the dough comes together.
Add the regular bread dough to a bowl, cover with a tea towel, and let the dough sit for 1 hour.
Next, take the other half of the flour, water, active starter, and salt, add it to the stand mixer, and add a tablespoon of cocoa powder. Mix until the dough has formed. Cover it with a tea towel and let that dough also sit for 1 hour.
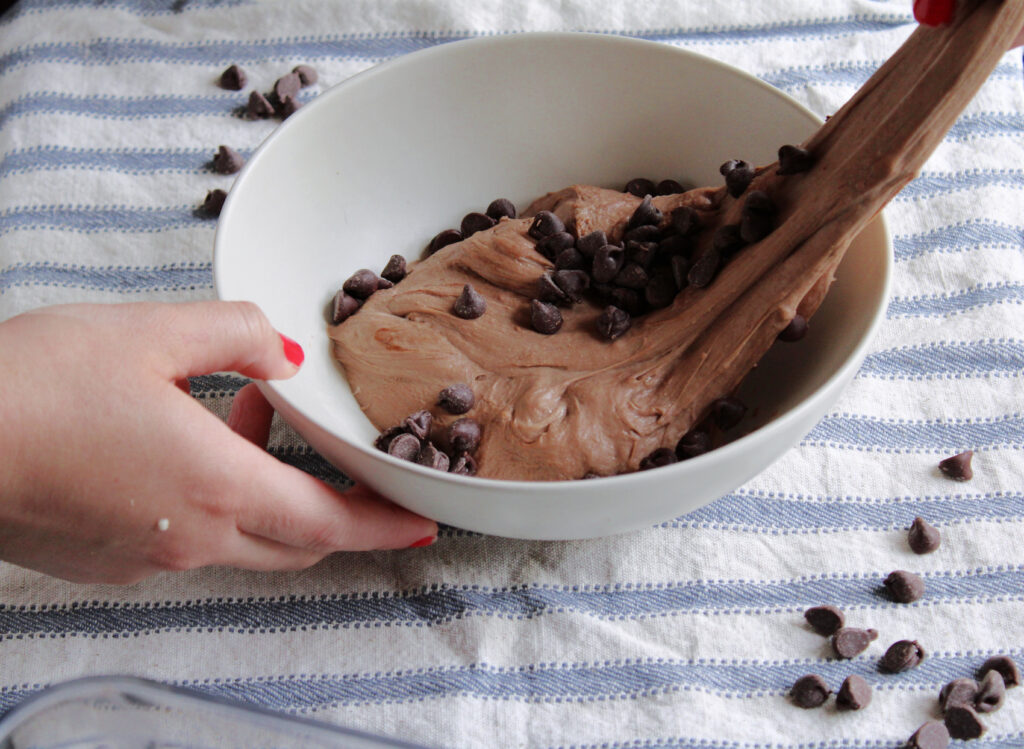
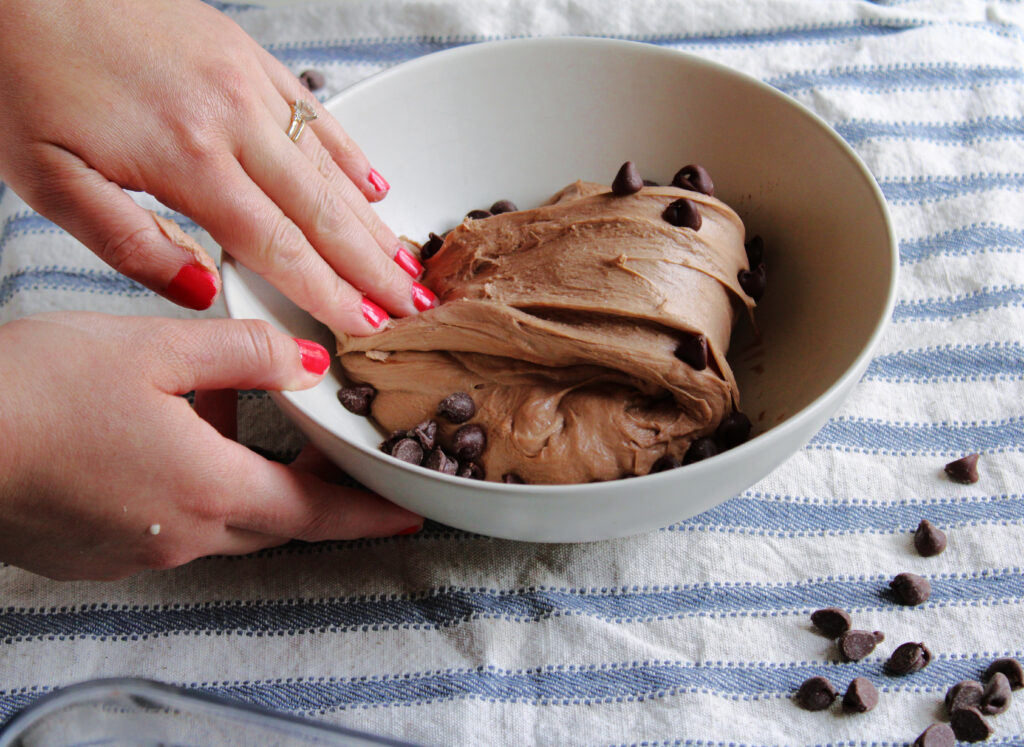
2. Stretch & Folds
After both doughs have sat for one hour, do three rounds of three stretch and folds that are about 20-30 minutes apart.
On the final stretch and fold for the chocolate dough, add the chocolate chips. Make sure you are folding the dough around the chocolate chips like this:
3. Bulk Fermentation
Let the dough ferment at room temperature allowing it to double in size. The temperature of your dough will determine how long your dough will need to sit at. Use the chart we linked earlier to see how long your dough needs to ferment for.
Signs your dough is done fermenting: bubbles on the sides and top, the dough pulls away from the bowl when you pull it towards you (no sticking to the bowl), the dough is jiggly when you wiggle the bowl.
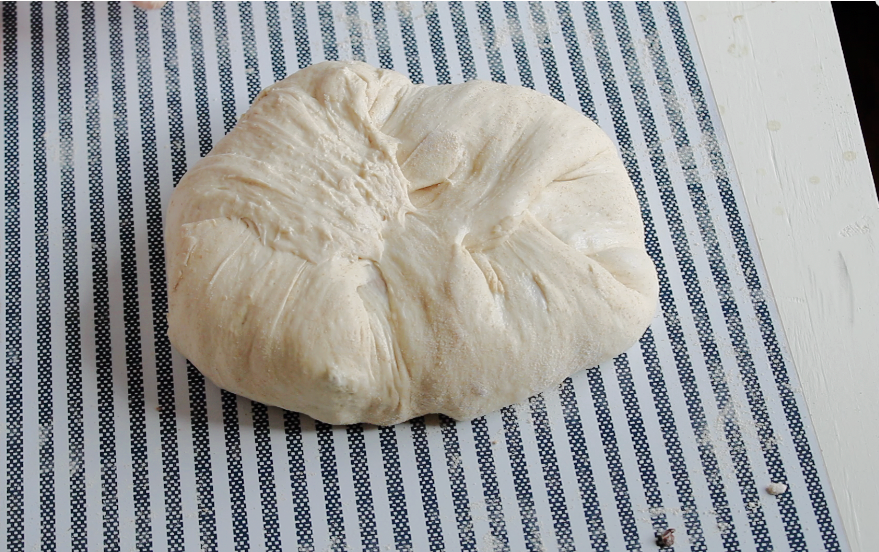
4. Final Shaping
On a floured surface, place your dough scraper at the bottom of your dough and use it to move your dough in a counter-clockwise circle tucking in the dough. Continue with this motion until the dough has tension.
5. Final Proof
Place your regular dough and your chocolate dough in banneton baskets or two seperate bowls and cover with a tea towel or plastic bag. Place them in the fridge for 12 hours or overnight.
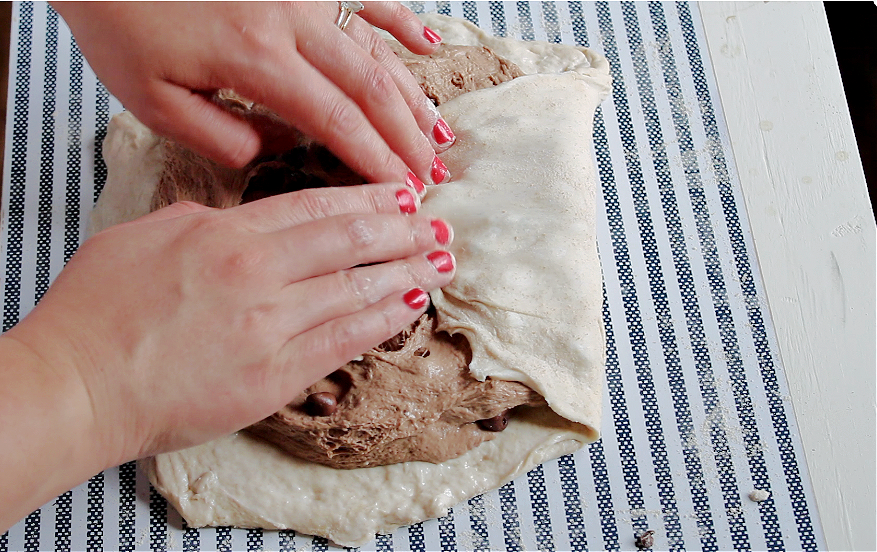
6. Layering
On a floured surface, take your regular dough and stretch it into a rectangle.
Next, take your chocolate dough, stretch it into a smaller rectangle, and place it over the regular dough.
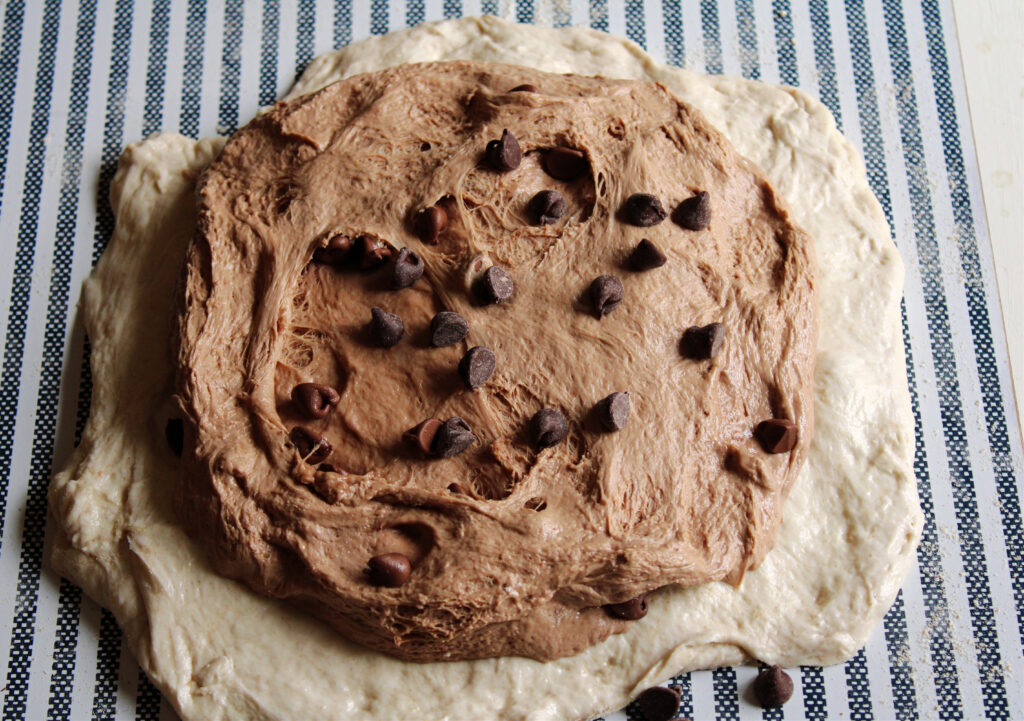
Now, alternate folding the sides of the dough into the center of the dough rectangle.
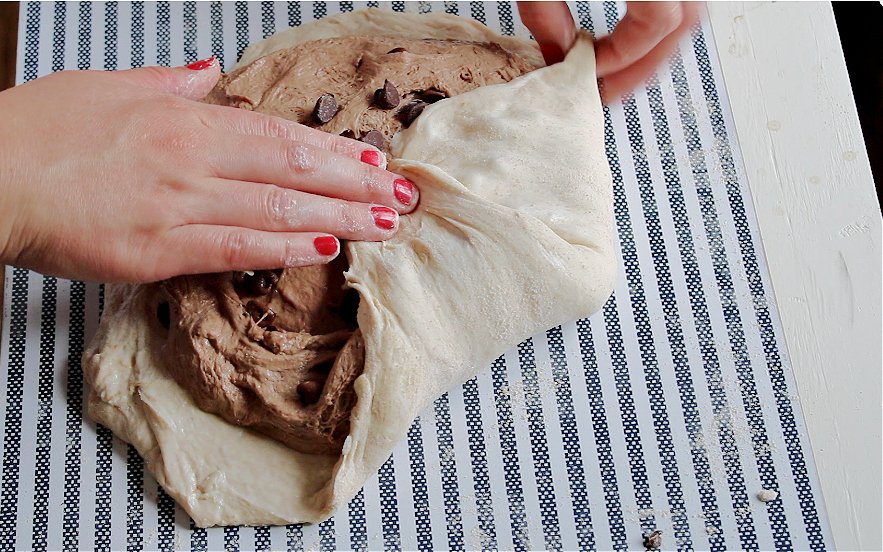
Once the dough has been stitched down the middle, take the bottom of the dough and roll it like a burrito away from you.


After the dough has been rolled up, pinch the ends of the dough closed.

7. Bake the Irresistible Chocolate Swirl Sourdough Bread
Preheat your oven to 420 degrees. Preheat your dutch oven as well.
While your oven is preheating, score your bread by creating a simple incision down the middle.
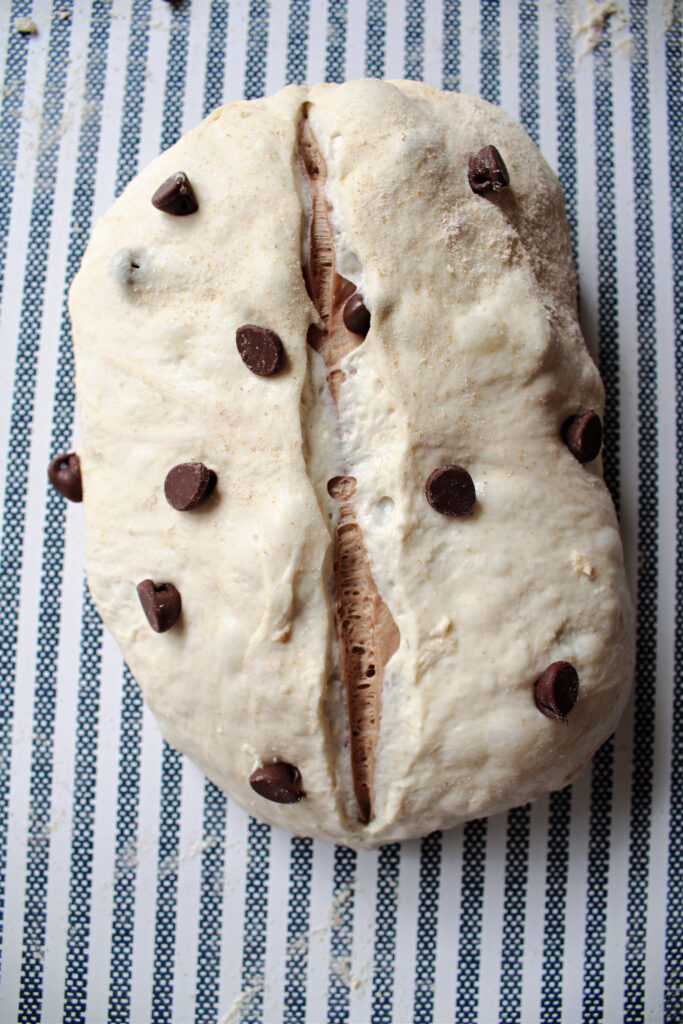
Bake your irresistible chocolate swirl sourdough bread at 420 degrees for 25 with the lid on and 25 minutes with the lid off.
Storage
Once your irresistible chocolate swirl sourdough bread is completely cooled, slice and store in the freezer. You can store in the freezer for 1 – 3 months and about a week in the fridge.
How to Make Irresistible Chocolate Swirl Sourdough Bread
Equipment
- Kitchen scale You can use measuring cups, but your ratios might be inaccurate
- Measuring spoons One for the chocolate dough, one for the normal dough
- Stand Mixer
- Two large bowls
- Tea towels
- Dough scraper For pre-shaping the dough
- Banneton baskets You can also use bowls.
- Dutch oven
- Lame or sharp knife for scoring
Ingredients
- 450 g bread flour
- 10 g salt
- 95 g active sourdough starter
- 307 g water
- 1 tablespoon Cocoa powder – chocolate dough only
- 1 handful chocolate chips – chocolate dough only
Instructions
Feeding Your Starter
- Feed your starter 4 – 6 hours before making this chocolate swirl sourdough loaf. You want your starter to be bubbly and active before mixing. If you want to be super accurate while doing this, use a 1:1:1 ratio (equal parts starter, water, and flour by weight). We follow the measurements below and still get a bubbly starter in the same amount of time. I also feed my starter right before bed the night before and it’s always ready to go in the morning. This could work great for those of you that have a colder home.
- 1/2 cup – bread flour
- 1/2 cup – whole wheat flour
- 1 cup – water
1. Making Both Doughs
- Combine half the amount of flour, water, active starter, and salt into a stand mixer until the dough comes together.
- Add the regular bread dough to a bowl, cover with a tea towel, and let the dough sit for 1 hour.
- Next, take the other half of the flour, water, active starter, and salt, add it to the stand mixer, and add a tablespoon of cocoa powder. Mix until the dough has formed. Cover it with a tea towel and let that dough also sit for 1 hour.
2. Stretch & Folds
- After both doughs have sat for one hour, do three rounds of three stretch and folds that are about 20-30 minutes apart.
- On the final stretch and fold for the chocolate dough, add the chocolate chips. Make sure you are folding the dough around the chocolate chips.
3. Bulk Fermentation
- Let the dough ferment at room temperature allowing it to double in size. The temperature of your dough will determine how long your dough will need to sit at. Use the chart we linked earlier to see how long your dough needs to ferment for.
- Signs your dough is done fermenting: bubbles on the sides and top, the dough pulls away from the bowl when you pull it towards you (no sticking to the bowl), the dough is jiggly when you wiggle the bowl.
4. Final Shaping
- On a floured surface, place your dough scraper at the bottom of your dough and use it to move your dough in a counter-clockwise circle tucking in the dough. Continue with this motion until the dough has tension.
5. Final Proof
- Place your regular dough and your chocolate dough in banneton baskets or two seperate bowls and cover with a tea towel or plastic bag. Place them in the fridge for 12 hours or overnight.
6. Layering
- On a floured surface, take your regular dough and stretch it into a rectangle.
- Next, take your chocolate dough, stretch it into a smaller rectangle, and place it over the regular dough.
- Now, alternate folding the sides of the dough into the center of the dough rectangle.
- Once the dough has been stitched down the middle, take the bottom of the dough and roll it like a burrito away from you.
- After the dough has been rolled up, pinch the ends of the dough closed.
7. Bake
- Preheat your oven to 420 degrees. Preheat your dutch oven as well.
- While your oven is preheating, score your bread by creating a simple incision down the middle.
- Bake your irresistible chocolate swirl sourdough bread at 420 degrees for 25 with the lid on and 25 minutes with the lid off.
Notes
- Adding inclusions will make the bulk fermentation process a bit slower so if it needs to sit out much longer than you’re used to, that’s okay.
- Adding the cocoa powder to the dough will absorb more water so you might not have to do as many stretch and folds. If the dough is tight, don’t worry about how many stretch and folds you’ve done.
- Add the chocolate chips to the last round of stretch and folds. This will make it a bit easier to fold the chips into the dough since the dough will have a bit more structure.
- The bulk fermentation chart we’ve linked in our post is so helpful!
- If you need a timeline, please check out our bakers schedule in the post.
If you liked this recipe it would mean the world to us if you gave it 5 stars! Don’t forget to tag us on Instagram @goldenhourgrains to show us your wonderful creations!
Want More Sourdough Recipes?
Check these out!
Protein-Packed Sourdough Waffles with Strawberries
Pin for Later:

Leave a Reply